Showing posts with label stocking up. Show all posts

Monday, January 14, 2013

Something From Nothing: Turkey Stock

Okay, so it's not really something from nothing, but it is something useful made out of stuff you would have otherwise thrown out.

I like to make my own turkey stock to keep on hand.  It is easy, practically free, and I have control over what goes in it (no MSG, for example).

To make your own turkey stock, you really only need two things:  turkey bones and water.  You can certainly add aromatics like onions, garlic, carrots, and celery, and you can add salt and seasonings if you want, but I like to keep it simple.

After cooking and consuming a turkey, I put the bones and leftover skin in a large ziplock bag and pop it in the freezer until I am ready to make stock.  I almost always make stock during the winter months so I don't have a pot simmering on the stove all day during the summer.

The bones go in the stock pot.
Just add water.
I don't add salt to my stock so I have control over the sodium content of my finished recipes.  Sometimes I add a few bay leaves and some whole peppercorns.  I simmer my stock for eight to 12 hours, and boy, does it make my house smell good!

At the end of the day, I fish as many of the bones out of the stock as I can using tongs.


Then I pour the stock through a cheese cloth-lined colander into another large container.

I use clothespins to keep my cheese cloth in place.

At this point the stock needs to be cooled down.  This is another reason I make stock in the winter:  I can just put the pot out on the deck.  The world is my refrigerator (or freezer)!  I cool the stock outside overnight, then skim the fat off with a spoon.

I used to package the finished stock either in containers or freezer bags and store it in the freezer.  This took up tons of freezer space, and I found I was reluctant to use the stock since I had to plan ahead and thaw some out.  Now I can it, so I have jars of home made stock ready to go at a moment's notice!

If you choose to can your stock, it is important that you use a pressure canner, and be sure to follow the directions that come with it.  I canned this batch and gave it to my mother in law for Christmas, because I'm the type of person who gives turkey juice to her mother in law.

The batch size depends on how large your stock pot is.  I get 12 quarts out of one batch.

You can also make stock in a crock pot, if you prefer.  Just put your bones and water in your crock pot and leave it on low all day (or overnight).

Chocolate Milk Stout: Brewing

Damian got a beer making kit for Christmas.  Let's make beer!  His first batch was an ESB, which is being force-carbonated in our kegerator now.  This is our second batch.  I voted for a chocolate milk stout.  We are not awesome enough (or ambitious enough) to attempt an all-grain recipe yet.  So, we bought a kit with malt syrup.


Sounds good!


Step one for brewing beer is to wash and sanitize EVERYTHING.  Dirty gear will lead to skunky beer at best.


No one complains about doing dishes when it leads to five gallons of beer (he never complains about dishes, really).

While Damian worked on the tedious cleaning job, I put two and a half gallons of (bottled) water in our stock pot.


Then I added the grain and turned the burner on high.  Also, the jug of malt syrup is in a pot of water over very low heat.  It's thick, sticky stuff, so it helps make it more pour-able to warm it up some.  There is a towel on the bottom of the pot to keep the jug from getting too warm.

Giant tea bag of cracked, roasted grain.
This is either very young beer, or the most disappointing tea ever.

We steep the grain until the water reaches 170 degrees Fahrenheit.

Probe thermometers with temperature alarms are the best!

Damian is pressing the liquid out of our giant tea bag.

Next we brought the brew to a boil, took the pot off the heat, and added our sugars.

Adding the malt syrup.  This stuff tastes so yummy!

Adding the lactose.  This is what makes it a milk stout.

Once the sugars were stirred in, we put the pot back on high heat and brought it back to a boil.  Now we got to start calling the brew a "wort."  This is fancy talk for "young beer."  Once the wort was back at a boil, it was time to add some hops.


Hop pellets:  they look like rabbit food.


The wort was boiled for 30 minutes, then another round of hops was added in.

Only 1/2 ounce this time.

We boiled the wort for 30 more minutes, then cooled it down as quickly as possible.  It's important to get the wort below 100 degrees Fahrenheit as quickly as possible.  We did this by putting a bag of ice in the primary fermenter (big, sanitized bucket) and pouring the wort over the ice.  Then we added enough cold bottled water to bring the total volume up to five gallons.

The ice goes in.


Then the hot wort goes in.
Next up, we needed to aerate (stir) the wort so the yeast would have enough oxygen to be happy, eat sugar, and make our beer worth drinking.


Science time!  We took a small sample of the wort to check the specific gravity of the mixture.

Fun with a hydrometer.  The specific gravity was 1.052, which is what we were aiming for.

Once the wort dropped below 80 degrees, it was safe to add the yeast.


Keeping it clean:  the yeast packet, the scissors used to cut it open, and the gloves I am wearing were all sanitized.  The yeast are the only micro organisms invited to this party!

And now we wait.  The beer will hang out for about a week in the primary fermenter, then we will move it into a glass carboy for the secondary fermentation.  The cacao nibs will be added about two weeks before we bottle the stout.  I will post an update when I know how our beer turned out!

Don't you keep a big bucket of beer in your linen closet?  Why not?

Sunday, November 11, 2012

Cranberry Sauce

About a month ago I got an email from a local garden center about cranberries.  They would be selling five-pound boxes of Wisconsin-grown cranberries, and they were accepting preorders.  Deciding that this was a fabulous idea, I ordered one box.

Then I got my cranberries.


Five pounds is a lot.  I decided to make it all into cranberry sauce.

Once upon a time, I ate cranberry sauce from a can, and it was fine.  Then, one day, I came across a recipe for cranberry sauce in a magazine, and I thought I would give it a try.  It was easy, and so very, very good.  I never looked back.  I am now a cranberry sauce snob.  Sorry.  The original recipe was from the magazine Everyday With Rachael Ray.  I have tinkered with it just a little, mostly to cut down on the refined sugar that you need to add in order for this to be edible.

Here's what you need:

(I am giving you the quantities for a normal batch of sauce, not a "hey, I just bought five pounds of cranberries, now what?" size batch.)
  • 1/2 cup sugar
  • 1 cinnamon stick
  • 2 teaspoons finely chopped ginger
  • The grated zest and juice from one orange
  • Enough water to bring your total liquid to one cup (with orange juice)
  • 1/4 teaspoon salt
  • 1/8 teaspoon ground cloves
  • 1 12-ounce bag fresh cranberries
Zesty!
Wash your cranberries, and grate your orange peel.  A microplane works best, but I used my box grater since I had to zest so very many oranges.

Juicy!
Juice your naked orange(s).  Pour the orange juice into a measuring cup and add enough water to get a total volume of one cup. 


Peel and dice your ginger.  Did you know that a spoon actually works best for peeling ginger?  It's true.  If you don't want to have small chunks of ginger in your sauce, feel free to grate it instead.  Assemble your spices.


Everything goes in the pot.  I had to use my giant stock pot, you can use a medium saucepan for your normal little batch.  Turn on the heat and stir until the sugar has dissolved.  Bring the mixture to a boil, then reduce heat and simmer until the berries have popped and the sauce has thickened.


Since I am making such a mondo batch of sauce, I use this time to get my canner and gear all set up.  If you look closely, you will see that I turned the wrong burner on to keep the water in the canner at a simmer.  Oops.


Stir the sauce occasionally.  You really don't want to burn the sugar.  You can see some of the berries are starting to pop here. 


Saucy!
The sauce is done!  Transfer to a bowl and allow to cool.  You can keep this in the refrigerator for up to two weeks.  If you want to can your sauce, load hot jars, leaving a half inch head space.  Wipe the jars and seal with two-piece lids.  Place in a boiling water canner for 15 minutes (up to 1000 feet above sea level, longer if you live at higher elevations).


I now have more than enough cranberry sauce to get me through the holidays!  I hope you give this recipe a try. 

Tuesday, October 30, 2012

Squash Puree


What a drizzly, cold autumn day.  What's a girl to do?


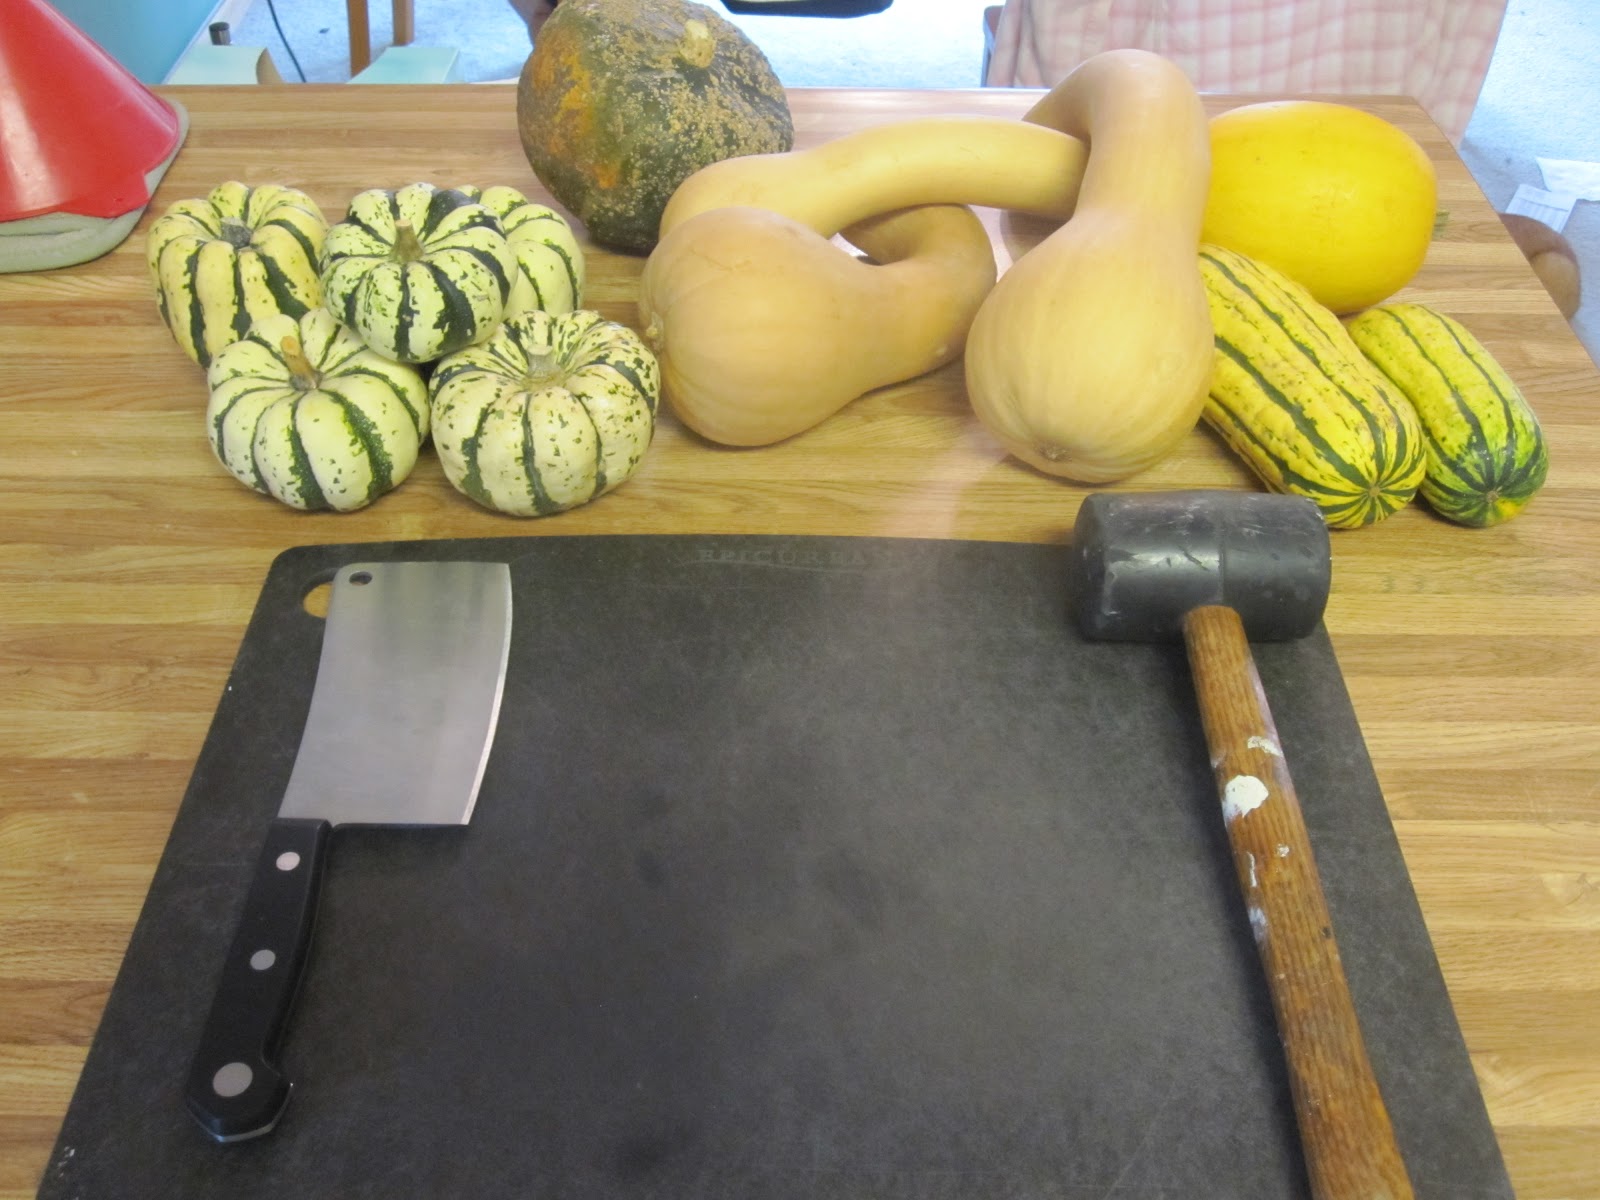
Oh hey!  A big pile of winter squash.  I know these buggers are supposed to keep well as they are, but last year I had a bunch go all squishy on me (all over the windowsill of the bow window), and if there's one thing I hate, it's wasting food.  Besides, any project where I get to use a meat cleaver and a rubber mallet is totally worth my time.

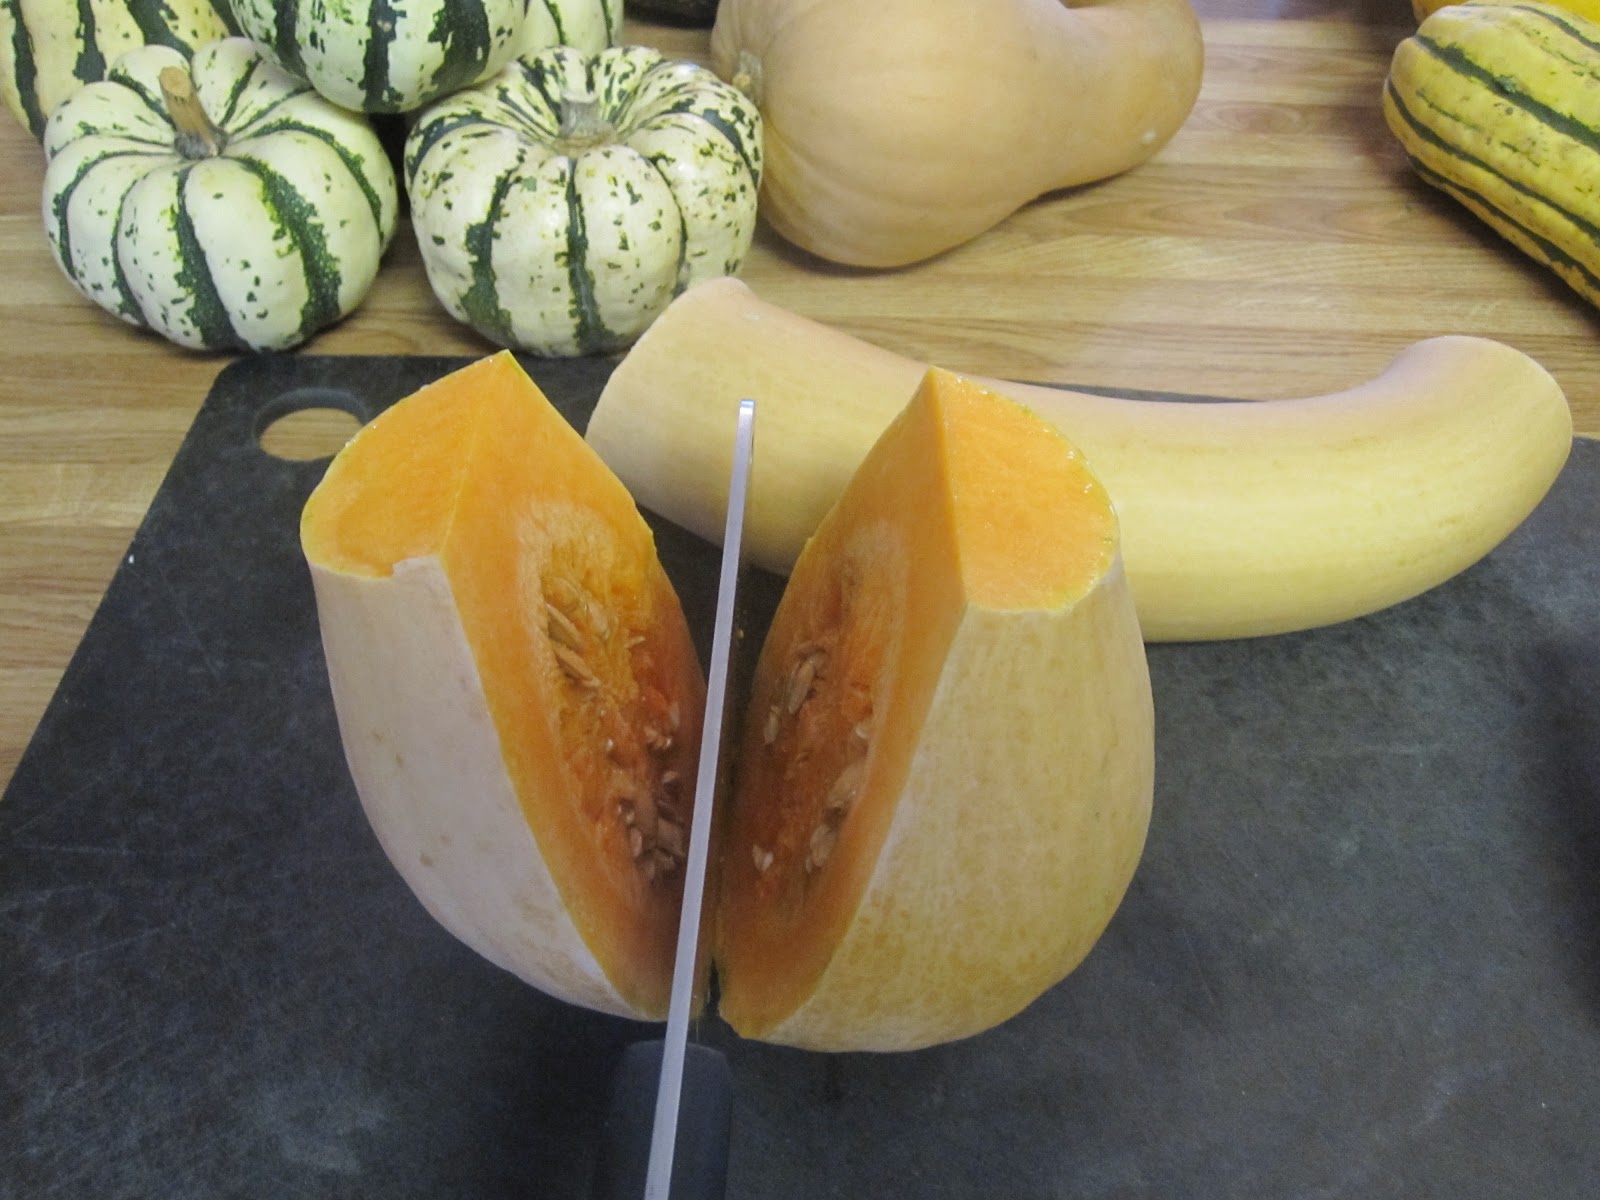
Why the meat cleaver and mallet?  Well, squash are kind of tough to cut up, the roll when you least want them to, I am clumsy, and I would really like to keep all my digits.


Cleaver placement.

Part way through.
Ta-da!
To cut apart the squash, center the cleaver on the top of your squash and tap it with your rubber mallet.  Don't be like me and smack your thumb with the rubber mallet.  That hurts.  This is the best I could do for action shots.  Despite being a mom, I have yet to grow that third arm that I so desperately need.  I am also still waiting for the eyes in the back of my head to show up.

For the butternut squash, I just cut off the necks with a knife. 


After cutting all the squash you want to roast, scoop out the seeds and stringy pulp.  I find a grapefruit spoon to work best for that icky task.  Then put your squash cut-side down in baking dishes, and put about an inch of water in each dish.  This helps to keep the squash moist, and keeps it from fusing to your dishes.  Bake at 350 degrees and check it after about an hour.  It's done when you don't feel any resistance when poking it with a knife.


Allow the squash to cool a while.  No one wants blisters on their hands.


When the squash is cool enough to handle, scoop the flesh into a food processor and whiz it up.


You can package your squash puree however you prefer, but I like to measure it so I know what I'm dealing with.  Two-cup portions works well for me, so that's how I bag it.


I package my squash in quart size Ziploc freezer bags.  I find it helpful to label each bag with what it is, the quantity, and the date.  Squeeze out the air, and flatten the bags out.  I freeze mine on a sheet pan, then store them upright in a box once they are frozen solid.

Since I didn't add any seasonings to my puree, I can use the squash in sweet or savory dishes.  I can make soups, pies, or just serve it up plain.

Thanks for stopping by, and enjoy those winter squash!

Monday, October 22, 2012

Smoke 'em if you got 'em: Pork butt!

I love when Damian cooks, because things like this happen:


Yeah.  That's four pork butts.  But I'm getting ahead of myself.

We are fortunate enough to have a great big chest freezer, which we keep stocked with tasty food for us to eat.  Also a lot of dog food.  Our dog eats chicken backs, and you do not want to get the people food and dog food mixed up.  But I digress.

One of the varieties of tasty food we like to keep in the freezer is smoked pork butt.  It can be thawed out quickly, and it is a lot easier to resist ordering a pizza on those too-lazy-to-cook days when you know you can have a pile of pulled pork without much effort or cost. 

Anyway, we ate the last one about a month ago, so it was time to smoke another.  We usually cut one in half, eat half, and freeze half.  But really, if you're going to fire up the smoker, why not load it up?


The first step (after procuring your pork, of course), is to build your brine and get those butts soaking!  Damian uses Alton Brown's recipe, and it is fantastic.  These guys get to hang out in the drink overnight.


The next day, you fish your butts out of the brine, apply your rub, and plop them in the smoker.  We are total cheaters and have an electric smoker with an integrated probe thermometer.  It even has a remote control.  If you are hungry, this is going to be a very long day.  I was out planting garlic after eating what turned out to be a rather unsatisfactory lunch, and it took some self control to not rip the smoker open and grab a hunk of meat.  What I'm trying to say is that it smells like heaven, if heaven happens to smell like smoking pork products.


At the end of the day, this is what you've got.  So pretty.  And it's cheaper than hamburger.  At this point, you can either do what we did and cool it down completely before cutting each butt in half and wrapping them (in a layer of cling wrap followed by two layers of heavy duty aluminum foil) to freeze, or you can start pulling and dig in!  A cool time-saving trick we've learned for pulling pork is to remove the bone and fat cap, then toss the meat into the bowl of our stand mixer.  Use the dough hook on a low speed to pull the pork.  You might not get the perfectly uniform little bits that pulling with a few forks would give you, but it only takes about 30 seconds, and you are much less likely to burn yourself.  You can either eat these in pulled pork sandwich form, or do what I love to do:


Potachos!  That's right.  Potato chips, pulled pork, barbecue sauce, and queso.  So bad, but oh so good.  (Please don't judge me too harshly.)